expr:class='"loading" + data:blog.mobileClass'>

Labels

Showing posts with label Tutorials. Show all posts

Wednesday, 30 September 2015

How to use Folder Protector?

When you run Folder Protector for the first time, the program will ask you for a password that you want to use. Enter a password that you can remember as this will be the password to your protected folder.   
Lock Folder With Password
After entering the password, the program will open a folder named SecuredFILES. This is your protected folder. You can add all your private files in this folder. This folder is located at the Desktop. After adding all your files, you may close this folder. 

Then, you can use the menu in the program to lock your folder. To lock the folder, type lock as your action. After successfully locking the folder, FolderProtector will display that the folder is locked.
Free Folder Lock
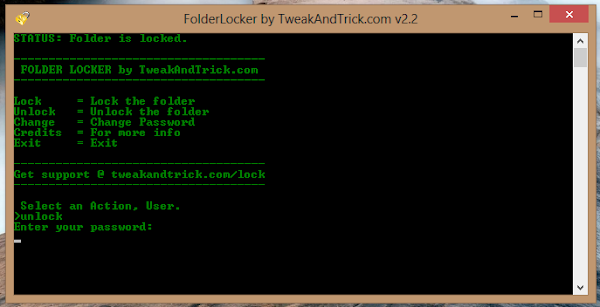
Unlocking the protected folder is easy. Just type unlock as your action. Then the program will ask you to enter your password. Upon successfully entering the password, the program will display the contents of your protected folder.

Changing the Password: Just type change as your action. The program will ask you for your current password. Upon successful entry of the current password, the program will ask for your new password and change it instantly.

Acknowledgment: This software has been made possible only through the suggestions of readers of this blog, especially Ernell Albert Galido for his idea of using a menu based interface.

Windows Compatibility: This program has been successfully tested on Windows 8.1, Windows 8, Windows 7, Windows Vista and Windows XP.

Tuesday, 29 September 2015

how to Use Rufus to create bootable USB media

If you too are one such user looking for a solution, you can stop looking and try RUFUS, an open source tool to create a bootable USB drive from any bootable ISO. 

Rufus is small in size (nearly 615 KB) and claims to be faster at creating bootable USB drives than most applications of its type. Rufus is also portable which means that you need not install this software to use it. Just double click on the executable file and the application will start working. Rufus also allows you to add fixes to use your bootable flash drives on older computers having BIOSs which do not support booting from them.

Strangely however, Rufus can only create bootable flash drives from ISOs meaning you need to have an ISO image of the CD or DVD of the OS of your choice. 

I do not think this should be too much of a problem considering how easy it is to create ISOs from DVDs and CDs.


YOU CAN DOWNLOAD THIS SOFTWARE HERE==>>   Download Here

How to use Rufus?

1) When you start Rufus, the first option that you will see is Device:. It contains all your connected USB drives. If you plug in a USB drive after starting Rufus, the drive you have connected will shortly be available here.

2) You will not need to modify the Partition Scheme and target system type, as the default choice is suitable for making the USB drive work on both UEFI and legacy BIOS computers. 
                                                    

3) Change the file system from FAT32 to NTFS from the dropdown menu. This is the file system with which your USB drive will be formatted with. Do note that older computers will not boot from a flash drive formatted as NTFS. Do not modify the cluster size. Enter the name you want for your USB device in the Volume label box.

4) Check the Create a bootable disk using checkbox if it is not already checked. In the dropdown menu next to it, select ISO image. Click on the button right to it to locate your ISO image.

Do note that Rufus will format your USB drive deleting everything on it before making it bootable. So, make sure that it does not contain any important data.

5) Click on Start to format your USB drive and extract all files of the ISO to it.

To install the OS, restart your computer and select your USB device as the primary boot option in the BIOS boot menu. 

Compatibility
Rufus works on all the latest versions of Windows and can be used to extract the following ISOs to a bootable USB drive:-
Arch Linux, Archbang, BartPE/pebuilder, CentOS, Damn Small Linux, Fedora, FreeDOS, Gentoo, GParted, gNewSense, Hiren's Boot CD, noppix, KolibriOS, Kubuntu , Linux Mint, OpenSUSE , ReactOS, rEFInd, Slackware, Tails, Trinity Rescue Kit, Ubuntu, Ultimate Boot CD, Windows XP (SP2, SP3), Windows Server 2003 R2, Windows Vista, Windows 7, Windows 8, Windows 8.1, Windows 10 and many more.

Sunday, 27 September 2015

How to Recover Data through Testdisk Step By Step

Example problem

We have a 36GB hard disk containing 3 partitions. Unfortunately;
  • the boot sector of the primary NTFS partition has been damaged, and
  • a logical NTFS partition has been accidentally deleted.
This recovery example guides you through TestDisk, step by step, to recover these 'lost' partitions by:
  • rewriting the corrupted NTFS boot sector, and
  • recovering the accidentally deleted logical NTFS partition.
Recovery of a FAT32 partition (instead of an NTFS partition) can be accomplished by following exactly the same steps. Other recovery examples are also available. For Information about FAT12, FAT16, ext2/ext3, HFS+, ReiserFS and other partition types, read Running the TestDisk Program.
One condition:
  • TestDisk must be executed with Administrator privileges.
Important points for using TestDisk:
  • To navigate in TestDisk, use the Arrow and PageUp/PageDown keys.
  • To proceed, confirm your choice(s) with the Enter key.
  • To return to a previous display or quit TestDisk, use the q (Quit) key.
  • To save modifications under TestDisk, you must confirm them with the y (Yes) and/or Enter keys, and
  • To actually write partition data to the MBR, you must choose the "Write" selection and press the Enter key.
VEDIO TUTORIAL BELOW==>>