expr:class='"loading" + data:blog.mobileClass'>

Wednesday, 30 September 2015

How to use Folder Protector?

When you run Folder Protector for the first time, the program will ask you for a password that you want to use. Enter a password that you can remember as this will be the password to your protected folder.   
Lock Folder With Password
After entering the password, the program will open a folder named SecuredFILES. This is your protected folder. You can add all your private files in this folder. This folder is located at the Desktop. After adding all your files, you may close this folder. 

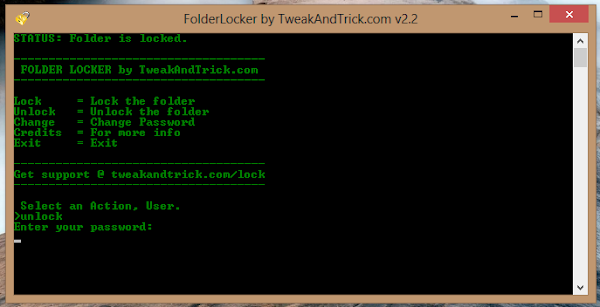
Then, you can use the menu in the program to lock your folder. To lock the folder, type lock as your action. After successfully locking the folder, FolderProtector will display that the folder is locked.

Free Folder Lock
Unlocking the protected folder is easy. Just type unlock as your action. Then the program will ask you to enter your password. Upon successfully entering the password, the program will display the contents of your protected folder.

Changing the Password: Just type change as your action. The program will ask you for your current password. Upon successful entry of the current password, the program will ask for your new password and change it instantly.

Acknowledgment: This software has been made possible only through the suggestions of readers of this blog, especially Ernell Albert Galido for his idea of using a menu based interface.

Windows Compatibility: This program has been successfully tested on Windows 8.1, Windows 8, Windows 7, Windows Vista and Windows XP.

Tuesday, 29 September 2015

Folder Protector v2.5

Folder Protector offers each user a protected folder that can only be opened by entering the password in FolderProtector. Unlike most security programs, Folder Protector is small in size (nearly 58KB) and does not show the folder that it is protecting. This gives an additional advantage that people who don't know the password do not have a target to try and hack their way into. As the software is portable, you can hide it or even delete it after protecting your folder and no one will have a clue that it was used. Then whenever you need to access protected files, you can re-download the program from this page, enter the password and access your protected files.
                                                                                                 Lock Folder Windows
Download Folder Protector Here==>>

Shutdown Your Computer or a Remote PC via Command Prompt

Most of us shutdown our computers using the power button given in the Start menu. Some of us use the physical power button on our machines. Very few people actually use other means of shutting down a computer and even less is the number of people who use the command prompt to shutdown a computer.

A reason for this is that most of us don't know that the command prompt can be used to not only shutdown, restart or log off our
 computer instantly but also to shutdown a remote computer provided you have administrative access. It can also be used to hibernate a computer and give a comment containing the reason for shutdown. This post will show you how to do all this.                                                                             


Shutdown computer with command promptRequired
A computer running Windows (XP, Vista, 7, 8 or 8.1) with the command prompt working perfectly, i.e. not 
disabled by a virus.

Initial Steps 
1) Press Windows Key + R.
2) Enter CMD and press Enter.

This will start the command prompt. Follow the instructions below depending on what you want to do.

Shutdown Local Machine (Your Computer)
Type "shutdown -s" without the quotes in the command prompt and press Enter. Shutdown is the command being executed and the switch -s tells the computer to shutdown.

Restart your Local Computer 
Type "shutdown -r" in the command prompt and press Enter. In this case, the command switch -r is telling the computer to restart after shutdown.

Log Off the Current User
Type "shutdown -l" in the command prompt and press Enter. The -l command switch tells the computer to log off.

Shutdown a Remote Computer
Type "shutdown -s -m \\name of the computer" in the command prompt and press Enter. Replace \\name of the computer with the actual name of the remote computer you are trying to shutdown. As mentioned earlier, you must have administrative access to the computer you are trying to shutdown. To know if you have administrative access, press Windows key + R and then type the name of the computer and press Enter.

Note: If you don't remember the name of the remote computer, you can look for it by opening a list of all the computers you are connected to by executing "net view" in command prompt.

If you can connect to the computer, you will be asked to login with your username and password. Upon entering them, a window will display the list of all the directories available to you. This should help you know whether you can or cannot shutdown the remote computer.

Hibernate a Local Computer
Type in "Rundll32.exe Powrprof.dll,SetSuspendState" without the quotes and press Enter. Your computer should hibernate, if it does not, then you must enable hibernation to do this.

Shutdown your or a remote computer after a specific time
Type "shutdown -s -t 60" to shutdown your computer after 60 seconds. Upon executing this, a countdown timer displaying a warning message will be shown. This command uses the -t command switch followed by a variable (which is 60 in this case) which represents the number of seconds after which the computer will shutdown.

Display a Message containing the reason for shutdown
Type shutdown -s  -t 500 -c "I am tired. I don't want to work anymore." (with the quotes) in the Command Prompt and press Enter. The -c switch is used in the code to give the reason for shutting down and what is followed in quotes will be displayed in the dialog box as the reason. This can be used to display all sorts of funny messages. One example :-

Skynet has become self aware. John Connor did not stop me. You can not use your PC anymore.

Stop a System Shutdown
Type "shutdown -a" and press Enter. This will stop the system from shutting down if the countdown to shut down has not reached 0.

how to Use Rufus to create bootable USB media

If you too are one such user looking for a solution, you can stop looking and try RUFUS, an open source tool to create a bootable USB drive from any bootable ISO. 

Rufus is small in size (nearly 615 KB) and claims to be faster at creating bootable USB drives than most applications of its type. Rufus is also portable which means that you need not install this software to use it. Just double click on the executable file and the application will start working. Rufus also allows you to add fixes to use your bootable flash drives on older computers having BIOSs which do not support booting from them.

Strangely however, Rufus can only create bootable flash drives from ISOs meaning you need to have an ISO image of the CD or DVD of the OS of your choice. 

I do not think this should be too much of a problem considering how easy it is to create ISOs from DVDs and CDs.


YOU CAN DOWNLOAD THIS SOFTWARE HERE==>>   Download Here

How to use Rufus?

1) When you start Rufus, the first option that you will see is Device:. It contains all your connected USB drives. If you plug in a USB drive after starting Rufus, the drive you have connected will shortly be available here.

2) You will not need to modify the Partition Scheme and target system type, as the default choice is suitable for making the USB drive work on both UEFI and legacy BIOS computers. 
                                                    

3) Change the file system from FAT32 to NTFS from the dropdown menu. This is the file system with which your USB drive will be formatted with. Do note that older computers will not boot from a flash drive formatted as NTFS. Do not modify the cluster size. Enter the name you want for your USB device in the Volume label box.

4) Check the Create a bootable disk using checkbox if it is not already checked. In the dropdown menu next to it, select ISO image. Click on the button right to it to locate your ISO image.

Do note that Rufus will format your USB drive deleting everything on it before making it bootable. So, make sure that it does not contain any important data.

5) Click on Start to format your USB drive and extract all files of the ISO to it.

To install the OS, restart your computer and select your USB device as the primary boot option in the BIOS boot menu. 

Compatibility
Rufus works on all the latest versions of Windows and can be used to extract the following ISOs to a bootable USB drive:-
Arch Linux, Archbang, BartPE/pebuilder, CentOS, Damn Small Linux, Fedora, FreeDOS, Gentoo, GParted, gNewSense, Hiren's Boot CD, noppix, KolibriOS, Kubuntu , Linux Mint, OpenSUSE , ReactOS, rEFInd, Slackware, Tails, Trinity Rescue Kit, Ubuntu, Ultimate Boot CD, Windows XP (SP2, SP3), Windows Server 2003 R2, Windows Vista, Windows 7, Windows 8, Windows 8.1, Windows 10 and many more.

Skype

Skype is for doing things together, whenever you’re apart. Skype’s text, voice and video make it simple to share experiences with the people that matter to you, wherever they are.
With Skype, you can share a story, celebrate a birthday, learn a language, hold a meeting, work with colleagues – just about anything you need to do together every day. You can use Skype on whatever works best for you - on your phone or computer or a TV with Skype on it. It is free to start using Skype - to speak, see and instant message other people on Skype for example. You can even try out group video, with the latest version of Skype.
If you pay a little, you can do more things, in more ways, with more people – like call phones, access WiFi or send texts. You can pay as you go or buy a subscription, whatever works for you. And in the workplace, this means you can bring your entire ecosystem of workers, partners and customers together to get things done. Try Skype out today and start adding your friends, family and colleagues. They won’t be hard to find; hundreds of millions of people are already using Skype to do all sorts of things together.          

Download Now


Sunday, 27 September 2015

How To Make Your PC Faster - Guaranted

1. First, run a scandisk or checkdisk. Let Windows fix any errors.

2. Run a disk cleanup utility...this will flush your temporary internet folder, trash can, temp system files, etc.

3. Delete any garbage files or data...if possible, run a Duplicate File Finder program.

4. Run Defrag on all partitions (NOTE: run this after you have deleted all trash and excess files!)

5. Run a registry cleaner utility and delete or get rid of any orphaned entries in that registry.

6. Check your exisiting swap file for it's size and location (*will explain location later in the post). If you have alot of ram (i.e. 1 gig and over) set this swap file to something small, like 250 mb. The reason is that this will force Windows to load more into memory, resulting in faster performance (note: some games and applications actually require a certain sized swap file so check your applications performance after making a size adjustment for any error messages.)

7. Under XP, you can tell Windows to use Classic Style on your desktop, - this will remove the neat single click and internet-style desktop but for lower end systems this will improve performance in other areas, such as gaming and multi-tasking.

8. Run msconfig and under startup and only keep the programs that are essential to load in the tray icon (and hence stay resident in memory). Uncheck anything else non-essential, like an ATI or Nvidia control panel, Quicktime utility, Real Audio, etc.

9. Upgrade drivers! Check for the latest BIOS, video, motherboard, sound, etc drivers from the manufacturers. Alot of my friends had chipsets on their motherboard that had advanced disk management capabilities or AGP port settings but the drivers weren't loaded for them so they were never being used. A simple upgrade realized a noticeable difference. For instance, they didn't have the latest driver for their AGP port so it was set to 1x, instead of being used at 4x!

10. (OK, so this won't speed up your PC but it could save you alot of time and trouble later on!) After making all these improvements, make a working backup! I use Ghost, but for XP users you can also use System Restore...

-FOR ADVANCED USERS-

1. Take a look under the hood (for IDE owners). How are your IDE devices configured? If you have more than 1 hard drive, put the master hard drive on the primary IDE channel and the secondary hard drive on the secondary IDE channel (most motherboards have two IDE channels).

2. Place all CDROM drives, DVD readers etc. on the secondary IDE channel (or SCSI bus, etc). This will reduce I/O contention with your master hard drive which should have your OS and apps installed...

3. Remember when I mentioned the location of the swap file? OK, if you have 2 hard drives and you have one on the primary IDE channel and the other on the secondary IDE channel, move the swap file to a partition ON THE SECOND hard drive (on the secondary IDE channel). This will greatly improve system performance as the PC can write to the swap file while loading and running OS and system commands without I/O contention on the primary IDE channel!

4. Take a look under the hood (for SCSI owners) What kind of SCSI do you have? If it's the newer Ultra 160/320 etc cards then guess what? Any devices placed on the same bus will automatically default to the slowest drive on the chain...this means that if you have say, an Ultra 160 SCSI card, and it has an Ultra 160 drive (capable of transferring 160 mb/sec) on the same chain as a SCSI cdrom drive (capable of only 40 mb/sec) then the whole bus slows down to the 40 mb/sec speed...use different chains for the slower devices and maximize those hard drives!

5. Run a utility like WCPUID and check the settings...is your CPU/front speed bus/AGP port running as fast as they should be? If not, check your drivers and BIOS configuration options. Also, are all of your chipset features enabled? If not, then enable them! (usually done in your BIOS!)

6. Dig in to the BIOS...check settings like boot order, for example...is it checking the floppy first? Change this! Select your order to reflect the hard drive first, then CD, then floppy for a noticeable boot time improvement. Also disable any non-used on board peripherals...for instance, - does your motherboard come with an on-board NIC card? Guess what, if you don't use that NIC card and it is enabled it will eat up valuable CPU cycles and can be detrimental to your systems' performance. DISABLE THAT MUTHA! Also, see if you can play with memory timing and CPU clock frequencies (NOTE! This is for expert users only!) Set these timings to "Aggressive" and see what happens in your games and apps...Also, check to see what your video aperature is set to. If you have a video card with 128 megs of on-baord memory, your aperature should be set to this amount too. Read the BIOS owner manual for further non-general performance tricks or improvements! Do you have the latest BIOS firmware version?

7. Under hardware properties, check to see that everything is working properly, and fix any hardware contention issues. You'll see the dreaded yellow exclamation point (!) beside any hardware componenet that is not working correctly.

8. Evaluate the potential for system/hardware upgrades...usually, the best bang for the buck is adding memory so buy all that you can afford (don't go much above 512 megs for Win 98 or ME). If you have a motherboard with an 8x - capable AGP port but you are using an older 4x video card, consider upgrading to an 8x card. You get the idea here...

9. Quit using software pigs like Norton system utilities, etc. These place files everywhere and can be a real system resource hog on lower end PCs.

10. Did I mention to make a good backup? Do it now! Also, while you're at it, run a good virus program with the latest definitions.

There are more options to make your system faster, such as overclocking, etc. but (just about) everything I've mentioned in this tech post costs you nothing and will result in faster system performance! Good luck and if you have any questions on how to do anything mentioned here, ask a knowledgeable friend or consult a book, - don't mess up something trying to do something you are not sure of!

Connecity Hotspot 2015 Full Version

                                            Features Page Screenshot

Easily Create a WiFi Hotspot and Connect all your Devices

Just give your Hotspot a name and password, and you’re ready to go. Connectify Hotspot isn’t just the world’s most powerful hotspot software, it’s the easiest, too.

Share Any Type of Internet Connection

Connectify Hotspot lets you easily turn your PC into a WiFi Hotspot so you can share Internet with all your devices. Turn a wired connection into WiFi at the click-of-a-button and even share an existing wireless network as WiFi. Upgrade to Hotspot 2015 PRO or MAX and share your 3G or 4G LTE networks, too.

Enjoy Safe and Secure Sharing

Your Hotspot is automatically secured with WPA2-PSK encryption, just like a conventional router. That means, all users get the safest and most secure WiFi sharing experience available.

Monitor Network Usage By Device

Our newest feature lets you monitor how much data your various connected client devices are using at a glance.

Fling Files to Connected Devices

Forget passing around USB thumb drives, Connectify Hotspot is the only software router that lets you wirelessly send files directly to connected devices, without even needing an Internet connection. Get PRO orMAX to unlock unlimited file flings.

Power ISO Free Download

n common use, an "ISO File" is a file that contains the complete image of a disc. Such files are often used when transferring CD/DVD images over the Internet. Depending on who you're talking to, "ISO File" may refer to all disc image files or only certain kinds. 
Going by the more restrictive definition, an "ISO File" is created by copying an entire disc, from sector 0 to the end, into a file. Because the image file contains "cooked" 2048-byte sectors and nothing else, it isn't possible to store anything but a single data track in this fashion. Audio tracks, mixed-mode discs, CD+G, multisession, and other fancy formats can't be represented. 
An ".ISO File" file can be manipulated in a number of ways: it can be written to a CD or DVD disc; mounted as a virtual drive; or viewed with PowerISO.
Overview
PowerISO is a powerful disc image file processing tool, which allows you to manipulate image files in lots of ways, such as open, extract, burn, create, edit, compress, encrypt, split and convert image files, and mount these files with internal virtual drive. It supports all popular CD, DVD, and Blu-ray disc image files.
If you have PowerISO, you will own ISO creatorISO editorISO extractorISO converterISO burnervirtual driveCD burnerDVD burnerBD burneraudio burneraudio ripper and video burner.
I
                                                                                                                                                                                                                        
Features                                                                                                                                                     Create ISO File
  • Create ISO file or BIN CUE file from hard disc files.
  • Create ISO file or BIN CUE file from CD / DVD / BD disc.
  • Create bootable ISO image file.
  • Detect various CD / DVD / BD image files automatically.
  • Support ISO9660, Joliet and UDF file system.
  • Support unicode file name.
  • Optimize file layout to save disc space.
Edit ISO File
  • Add files to ISO file.
  • Delete files in ISO file.
  • Rename files in ISO file.
  • Modify file's date time in ISO file.
  • Add boot information to ISO file to make bootable ISO image file.
Extract ISO File
  • Support ISO file and other popular disc image file, such as BIN / CUE, DAA, UIF, DMG, MDF / MDS, ASHDISC, BWI / B5I, LCD, IMG, CDI, CIF, P01, PDI, NRG, NCD, PXI, GI, FCD, VCD, C2D, BIF and so on.
  • Support multi-session disc image file.
  • Extract files from ISO file.
  • View and run files contained in the ISO file.
Burn ISO File
  • Burn ISO file and other image file to CD-R, CD-RW, DVD-R, DVD-RW, DVD+R, DVD+RW, DVD-RAM, DVD-R DL, DVD+R DL, BD-R, BD-R DL, BD-RE, BD-RE DL.
  • Burn Apple DMG files directly to CD / DVD / BD discs.
  • Burn files and folders to CD / DVD / BD discs on the fly.
  • Burn Audio CD from MP3, WMA, APE, FLAC, WAV, or BIN files.
  • Burn Video image file to CD / DVD disc.
  • Support two erasing modes for rewritable discs: Full Erasing and Quick Erasing.
Mount ISO File
  • Mount ISO file and other popular image file as virtual drive.
  • Support up to 23 virtual drives.
Make Audio Disc
  • Create standard Audio CD.
  • Create mixed mode CD.
  • Support Audio CD-TEXT.
  • Burn mp3, wma, wav, flac and ape files to CD.
  • Burn bin / cue, mp3 / cue, wma / cue, wav / cue, flac / cue and ape / cue audio image files to CD.
  • Edit existing Audio CD image files.
  • Support Playing Audio Tracks within Audio CD image file.
Audio CD ripper
  • Rip audio CD to mp3, wma, wav, flac and ape files.
  • Rip audio CD to bin / cue, mp3 / cue, wma / cue, wav / cue, flac / cue and ape / cue audio image files.
ISO and BIN Converter
  • Convert ISO to BIN.
  • Convert BIN to ISO.
  • Convert Apple DMG files to ISO file.
  • Convert all popular images files to ISO file.
  • Convert all popular images files to BIN file.
Open / Extract /Edit disk image file
  • Support all popular virtual disc image files, such as VMWare Virtual Disc Images(*.vmdk), VirtualBox Virtual Disc Images(*.vdi), Virtual PC Virtual Disc Images(*.vdi).
  • Support all floppy disk image files, such as BIF, FLP, DSK, BFI, BWI, BIN, IMG and so on.
  • Support disc image files with FAT12, FAT, FAT32, NTFS and ext2, ext3 partitions.
Create Bootable USB drive
  • Create bootable USB drive for Windows XP, Windows Vista and Windows 7.
  • Support USB-FDD, USB-ZIP, and USB-HDD.
Supported CD/DVD disc image types
  • ISO (Generic CD images)
  • BIN/CUE
  • BIN (CDRWin)
  • IMA/IMG (Generic disk images)
  • CIF (Easy CD Creator)
  • NRG (Nero - Burning ROM)
  • IMG/CCD (CloneCD)
  • MDF/MDS (Alcohol120%)
  • VCD (Farstone Virtual Drive)
  • VaporCD (Noum Vapor CDROM)
  • P01/MD1/XA (Gear)
  • VDI (Virtuo CD Manager)
  • C2D (WinOnCD)
  • BWI/BWT (BlinkWrite)
  • CDI (DiscJuggler)
  • TAO/DAO (Duplicator)
  • PDI (Instant Copy)
  • DMG (APPLE Disk Image)
Supported CD/DVD file systems
  • Standard ISO-9660
  • Joliet ISO extension (CDs under Windows 95 and higher)
  • RockRidge ISO extension (CDs under FreeBSD, Linux)
  • El Torito extension (bootable CDs)
  • Univeral Disk Format (UDF)
  • XBOX DVD Format
  • APPLE HFS
  • APPLE HFS+
Easy and friendly interface
  • Support drag and drop.
  • Support clipboard copy and paste.
  • Support multiple languages.
  • Support operating system: Windows NT 4.0, Windows 2000, Windows XP, Windows 2003, Windows Vista, Windows 2008, Windows 7
  • Support both 32-bit and 64-bit windows.


Download Now                                                                                                                


How to Recover Data through Testdisk Step By Step

Example problem

We have a 36GB hard disk containing 3 partitions. Unfortunately;
  • the boot sector of the primary NTFS partition has been damaged, and
  • a logical NTFS partition has been accidentally deleted.
This recovery example guides you through TestDisk, step by step, to recover these 'lost' partitions by:
  • rewriting the corrupted NTFS boot sector, and
  • recovering the accidentally deleted logical NTFS partition.
Recovery of a FAT32 partition (instead of an NTFS partition) can be accomplished by following exactly the same steps. Other recovery examples are also available. For Information about FAT12, FAT16, ext2/ext3, HFS+, ReiserFS and other partition types, read Running the TestDisk Program.
One condition:
  • TestDisk must be executed with Administrator privileges.
Important points for using TestDisk:
  • To navigate in TestDisk, use the Arrow and PageUp/PageDown keys.
  • To proceed, confirm your choice(s) with the Enter key.
  • To return to a previous display or quit TestDisk, use the q (Quit) key.
  • To save modifications under TestDisk, you must confirm them with the y (Yes) and/or Enter keys, and
  • To actually write partition data to the MBR, you must choose the "Write" selection and press the Enter key.
VEDIO TUTORIAL BELOW==>>

Testdisk_7.0 Data Recovery Software

TestDisk is a free and open-source data recovery utility. It is primarily designed to help recover lost data storage partitionsand/or make non-booting disks bootable again when these symptoms are caused by faulty software, certain types of viruses or human error (such as accidentally erasing a partition table). TestDisk can be used to collect detailed information about a corrupted drive, which can then be sent to a technician for further analysis.

                                                    100% Working


Supported operating systems

TestDisk supports these operating systems-

DOS: real or in a Windows 9x DOS box
Microsoft Windows: NT4, 2000, XP, 2003, 2008, Vista, Windows 7
GNU/Linux
FreeBSD, NetBSD, OpenBSD
SunOS
Mac OS X